Qualify/ Disqualify Applicants
Several factors affect how quickly a screener is completed.
Audience Scope: Broader screeners (general population) fill more quickly than narrowly targeted ones.
Effort vs. Reward: The level of effort your study requires and the incentive offered significantly influence applicant volume and speed.
Build in Review Time
Tip: If you’re working with strict quotas, allow extra time to review and possibly adjust your search criteria to meet your goals.Expect Variable Timelines
Some screeners may fill within 24 hours, while others take longer—this is normal and varies depending on your target criteria.
Review Applicants
Once you’ve published your recruit, applicants will begin completing the screener.
You can begin reviewing responses and assessing fit.
Click Recruit or View to open the Applicants page for that recruit.
Individual Applicant
Click 'View' on an Applicant to review their screener answers, as well as their profile details.


Review and Compare Applicants
Click on 'Download Respondents' to download a .csv list of applicants and how they have responded to the Questions in the Screener.
You might find it easier to review the applicants this way.

We recommend that you note your planned target groups in this export, to track fulfilment of your quotas.
Qualify/ Disqualify Applicants
All applicants who complete the screener—regardless of whether they qualify—will appear almost instantly under the Recruitment tab in your Indeemo Dashboard for review.
Applicants are not notified about whether they qualify or not after completing the screener.
Only qualified applicants count toward your maximum number of applicants.
- For example, if your target is 20, you'll receive 40 qualified applicants plus all unqualified ones.

If 'Qualified' the 'Invite' button will be available immediately.
If 'Not Qualified' you will need to click the 'Qualify' button first, if you wish to invite them.
Disqualify applicants
If you decide to Disqualify any respondent (regardless of their status)
- Click the '...' button and select Disqualify.
- A box will pop up, asking you why you have disqualified the respondent.
Respondents will not be made aware that they have been Disqualified.
- If you Disqualify a respondent, their status will change to 'Not Qualified'.
- The platform will work to recruit another respondent in their place.

We recommend Disqualifying any unsuitable ‘qualified’ recruits in order to keep the platform searching for more ‘qualified’ recruits.
Message Applicants
Click on your Recruit or 'View' and the 'Applicants' page opens for this recruit.
You can message an applicant as soon as they complete a screener, even if you haven't invited them to participate yet.
Applicants will receive an email to let them know that they received a message.
They can reply to your message.
Messaging is a shared feature between all moderators that are linked to your recruit.
(When creating your recruit you were prompted to input one name that respondents will see if any message is sent by any moderator on your recruit).
Moderators can see all messages, they will see if a new message comes in, and they can all reply.
Once you close a project, you will not be able to message an applicant.


Inviting Applicants: Indeemo App / In-The-Moment Project
1. Check the Project Set up
First, your Indeemo project must be fully set up in the Dashboard before you can start inviting applicants.
You can review the the project via 'Manage Projects' prior to sending invitations:
- Review your Target Group settings including start and end dates
- Review your Customised Respondent registration page (ensure the Welcome message clearly reflects the details of your project)
- Ensure your Opt-In Consent pdf has been added
- Review your Task List(s)
We recommend inviting respondents 1 day before your fieldwork goes live in order to give them some time to sign up.
2. Inviting Applicants
This is done via the Recruitment view:
- Click on your Recruit or 'View' and the Applicants page opens for the recruit you want to invite from
- On each applicant you want to invite, click 'Invite'

3. Choose the Project and then the Target Group you want them to join
4. Review/ Add Message or Special Instructions
5. Click 'Send Invite'

What happens next?
- The respondent gets a notification on their dashboard and will receive an email, advising them that they have been invited to your project.
- On your Indeemo Dashboard, the respondent's status changes from 'Pending' to 'Invited'.
- Once they accept the invite and register to take part, you will see them pop into the Respondents view under the relevant target group.

Inviting Applicants: Online 1-1 Interview


Note: If you cancel an interview within 4 hours of the start time, when you click the 'Cancel' button the respondent will automatically be paid there incentive.
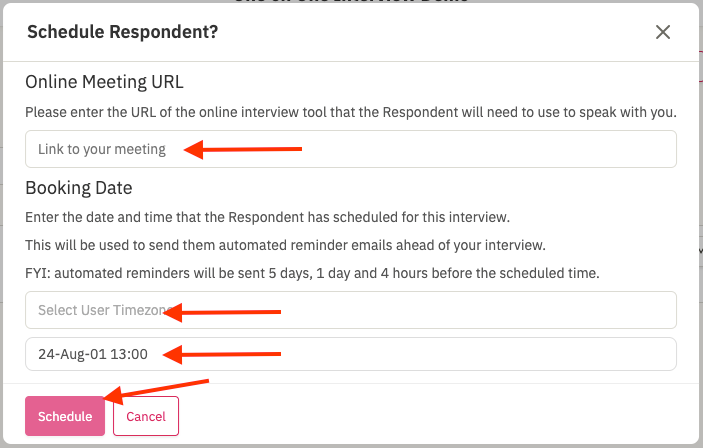
Rescheduling an Interview
Once an interview is scheduled, if you need to reschedule, click "..." and select 'Reschedule'.
This will change the respondent status back to 'Invited' from 'Scheduled' and the 'Schedule' button will reappear for you.
Click 'Schedule' and input the updated details.
Cancel an Invite
After you have sent an invitation message to an applicant, it is still possible to Cancel the invitation.
You can cancel an Invite by clicking 'Cancel Invite' next to the applicant.
What happens for the applicant?
- The applicant receives a notification that the invite has been cancelled.
- The original invitation is removed from their respondent.io profile/dashboard
- This also means they no longer can see the registration button.
- (Note in the event that they already had clicked the registration button - they would still be able to register)

(example of the message the respondent receives)
Re-inviting the applicant
If you wish to Re-Invite the applicant, simply follow the steps to invite them as normal again.
No Show
If a respondent does not sign up for your project, or do not begin their tasks in the timeframe you have outlined in your invitation, you can mark them 'No Show'.
If they have registered, please also go to 'Respondents' view and delete them to remove them from your project.
This applies a 'No Show' status to the Applicant on your Recruit.
What happens for the applicant?
- The applicant receives a notification that they have been marked as 'No-show'.
- The original invitation is removed from their respondent.io profile/dashboard
- This also means they no longer can see the registration button.
- (Note in the event that they already had clicked the registration button - they would still be able to register)
Re-inviting the applicant
If you wish to re-Invite the applicant, please contact support@indeemo.com
Cancel Invite vs No Show
When choosing which option is best for your scenario please note:
Applicant flow for both scenarios:
- The applicants are notified.
- The original invitation is removed from their profile/ dashboard.
Label on Recruit:
No show: this applies a 'No-show' status for tracking
Cancel invite: the status simply returns to 'Pending' - you will not see that you previously invited them.
Re-inviting the applicant:
No show: Cannot re-invite from Recruit - must contact Indeemo Support
Cancel Invite: Can re-invite from Recruit, simply click 'Invite'.
'Hide' Applicants
You can 'tidy up' your 'Applicants' view, by hiding respondents from your list.
This does not disqualify them, it does not remove them, it simply allows you to see only the applicants you want to see.
If you wish to hide an applicant from your list, simply click "..." and select 'Hide'.
To make the respondent visible on your Applicants list again, use the 'Visible' filter to filter to your 'Hidden' applicants, click "..." on that respondent and click 'Show'.