Qualifying/ Disqualifying Applicants
Click on your Recruit or 'View' and the Applicants page opens for this recruit.
Any applicant that completes the screener (whether they qualify or don't qualify) will appear almost immediately within your Recruit on the Recruitment tab of the Indeemo Dashboard for you to review.
Qualified & Not qualified
Any respondent that does not qualify based on recruitment criteria or how they answered screener questions will still appear for you, with the status 'Not qualified'.
They will not take up space within the max number of Applicants (ie if you have a target of 20, you will be shown 40 qualified applicants, along with all the 'not qualified' applicants.)
If they are set to 'Qualified' the 'Invite' button will be available immediately.
If they are set to 'Not Qualified' you will need to click the 'Qualify' button first, if you wish to invite them.
Click 'View' on a Respondent to review their screener answers, as well as their profile details.
Disqualifying applicants
If you decide to Disqualify any respondent (regardless of their status) simply click the '...' button and select Disqualify.
(A box will pop up, asking you why you have disqualified the respondent. Respondents do not know whether or not they qualify for your project, and disqualifying them will not alert them in any way.)
If you Disqualify a respondent, their status will change to 'Not Qualified'.

Download applicants/ respondents
Clicking on 'Download Respondents' will download a .csv list of applicants and how they have responded to the Questions in the Screener.
You might find it easier to review the applicants this way.

Messaging Applicants via Recruitment tab
Click on your Recruit or 'View' and the 'Applicants' page opens for this recruit.
You can message an applicant as soon as they complete a screener, even if you haven't invited them to participate yet.
Applicants will receive an email to let them know that they received a message.
They can reply to your message.
Messaging is a shared feature between all moderators that are linked to your recruit.
(When creating your recruit you were prompted to input one name that respondents will see if any message is sent by any moderator on your recruit).
Moderators can see all messages, they will see if a new message comes in, and they can all reply.
Once you close a project, you will not be able to message an applicant.


Inviting Applicants: Indeemo App / In-The-Moment Project
1. Check the Project Set up
First, your Indeemo project must be fully set up in the Dashboard before you can start inviting applicants.
You can review the the project via 'Manage Projects' prior to sending invitations:
- Review your Target Group settings including start and end dates
- Review your Customised Respondent registration page (ensure the Welcome message clearly reflects the details of your project)
- Ensure your Opt-In Consent pdf has been added
- Review your Task List(s)
We recommend inviting respondents 1 day before your fieldwork goes live in order to give them some time to sign up.
2. Inviting Applicants
This is done via the Recruitment view:
- Click on your Recruit or 'View' and the Applicants page opens for the recruit you want to invite from
- On each applicant you want to invite, click 'Invite'

3. Choose the Project and then the Target Group you want them to join
4. Review/ Add Message or Special Instructions
5. Click 'Send Invite'

The respondent gets a notification on their dashboard and will receive an email, advising them that they have been invited to your project.
On your Indeemo Dashboard, the respondent's status changes from 'Pending' to 'Invited'.
Once they accept the invite and register to take part, you will see them pop into the Respondents view under the relevant target group.
Inviting Applicants: Online 1-1 Interview


Note: If you cancel an interview within 4 hours of the start time, when you click the 'Cancel' button the respondent will automatically be paid there incentive.
Rescheduling an Interview
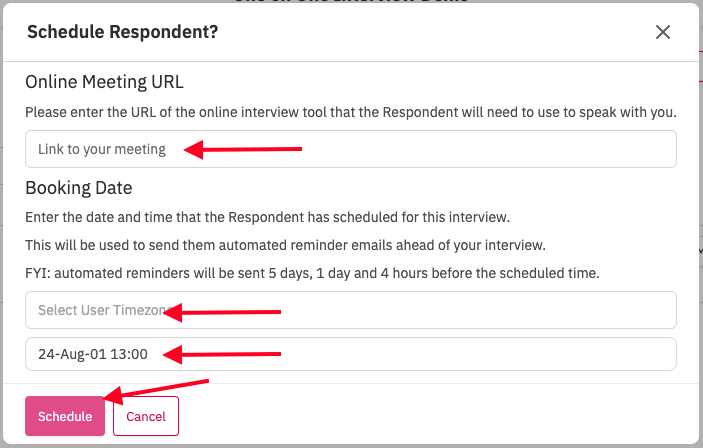
Once an interview is scheduled, if you need to reschedule, click "..." and select 'Reschedule'.
This will change the respondent status back to 'Invited' from 'Scheduled' and the 'Schedule' button will reappear for you.
Click 'Schedule' and input the updated details.
Cancelling an Invite / Interview
You can cancel an Invite by clicking 'Cancel Invite'.
The respondent receives a notification that the invite has been cancelled.
(example of the message the respondent receives)
No Show
Indeemo App/ In-the- Moment project
If a respondent does not sign up for your project in the timeframe you have outlined in your invitation, you can click on 'No Show'.
Online 1-1 Interview
A respondent can be marked as 'No-Show' 15minutes after the scheduled time of the interview.
Note: This will notify the respondent via a notification email that they have been marked as 'No Show'.
'Hide' Applicants
You can 'tidy up' your 'Applicants' view, by hiding respondents from your list.
This does not disqualify them, it does not remove them, it simply allows you to see only the applicants you want to see.
If you wish to hide an applicant from your list, simply click "..." and select 'Hide'.
To make the respondent visible on your Applicants list again, use the 'Visible' filter to filter to your 'Hidden' applicants, click "..." on that respondent and click 'Show'.


